Sunday, March 9, 2008

Foccacia (Italian Herb Bread)...

Winter is one time of the year I actually donot mind spending hours in front of a Hot Oven be it in the comfort of our Home or at Work...It is just not the heat but the delicious aromas that waft around the apartment when baking anything that actually inspires me to bake more and more...especially on a cold evening and guess what it tickles B's hunger pangs even more and he actually eats more than he usually does (which I am very happy about...because he is thin as a stick)...and enjoys the meal...and usually does not complain like he always does...

I was on a Bread Baking Mania sometime back...one item that I made sure that I baked on a regular basis was an Italian Herb Bread variety known as "Foccacia"... There is always a great debate on how the word 'Foccacia' is spelt and pronounced. Anyways I got this spelling from one of my teachers at school and he seems to be quite sure that this is the spelling...

We personally prefer this to the regular bread because it has olive oil and oregano, two of my favourite ingredients...and you can pile on any top garnish as you wish...I personally grate some cheddar cheese, chop up some olives and sun-dried tomatoes and spread that on top...to give that extra boost of taste....

You can eat this bread as it is or slice up and use as regular bread with whatever fillings you prefer...I eat it slices as it warm from the oven....or sometimes use it as an accompaniment to the soups and pasta dishes I make...

So here goes the recipe...to make one Loaf...
Ingredients:
250ml Water(lukewarm)
8gms Dry Yeast(1 Sachet) or 5gms if using Fresh Yeast
350gms Plain Flour
1teaspoon Salt
1teaspoon Dry Oregano
20ml Extra Virgin Olive Oil

Other Ingredients: (Optional)
A few Sun-Dried tomatoes( roughly diced)
A few Spanish Black Olives(sliced)
A Tablespoon of grated Cheddar Cheese
Some Dried Oregano to sprinkle on top
Olive Oil

Process:
1. Firstly Warm water until is body temperature or lukewarm...add the yeast to it and a teaspoon of SUGAR...then cover it and leave it aside for about 10 minutes...

2. Meanwhile sieve the flour... and add the salt, olive oil and dried oregano to the flour and mix in the ingredients well..

3. The yeast water after 10 minutes should appear frothy proving that the yeast has started growing...add this water to the flour mix and mix it till it becomes a smooth dough...if the dough appears sticky then add a little more flour to make the dough smooth...but a little moisture will actually help the dough to proove(yeast growing) well...knead well using your palms for about 10 minutes

4. Then place the dough in an oiled bowl...cover it and keep in it in a warm spot...and leave it till the dough doubles in size...

5. Then roll out the dough onto a floured surface and knock out all the air bubbles while kneading it...the dough will become its original size...

6. Then using fingers only shape the dough in the form of a loaf... and place it on a well oiled baking tray...(see the picture below for reference)


6. Then again place it in a warm spot the loaf increases in size (the above picture shows the already increased size of the loaf)...

7. Preheat the Oven to 180*C...

8. On the increased loaf, brush the top of the loaf liberally with olive oil...and sprinkle it with more Oregano...you can leave it like that if you donot like any other topping...but as I said earlier I like some stuff so I sprinkle grated cheese, olives and sun-dried tomatoes...(check the picture below for reference)


9. Then bake the loaf for about 15 - 20 minutes...the top of the loaf must be golden and when you lift the loaf and tap it on the bottom side...it should sound hollow...(be very careful when lifting the loaf to check this it will be very hot....use your oven mutt...so that it wont burn you...)

10. The finished product looks as the picture below...and as I already said you can eat as it is...and believe me the aromas are awesome and taste this warm bread on your palate cannot be described...and you will definitely fall in love with the art of Bread Baking...Trust me [:-)]


I will follow up this recipe with a wholesoup soup for which this bread goes as a great accompaniment...

Variation:
If you dont like Oregano...you can use dried Rosemary or Thyme....or any Italian Dried Herbs...

Image Source: My Trusty Phone Camera
Recipe Source: Bread Baking Class (with my own additions and deletions ofcourse..he he...:-D)

Disclaimer: Oven Temperatures Vary...so adjust accordingly...

Try this out and do let me know how it comes out...If you are trying baking bread for the first time...I suggest that you follow the recipe as it is...to avoid disappointment..(because remember baking is a art that you need to master before you can alter it...I have tried this many many times before I have gained the confidence...)

So Happy Cooking....:-)

Friday, March 7, 2008

Savoury Cheese Biscuits...

Recipe Origin and Background:
Baking is one of my passions...it was not from childhood but one that developed when i started experimenting some of the traditional recipes that i learnt mainly from my Mom..This passion almost became an obsession when we moved into our flat after I was married...I just started thinking of options to cook stuff using the oven that are sometimes time-saving but most importantly a very healthy option...

Once I started the patisserie course...I have learnt several tricks of a really good baked product be it general food stuff, snacks or cakes...both of us are not much of sweet persons (one hell of a contradiction to what i do...professionally cook sweet stuff all the time)...most my husbands day offs or free time are normally spent before the computer downloading something from the internet or cleaning up the system with his numerous anti-virus stuff...anyways this is the time he generally likes munching something...like nuts, crackers or jantikalu... one day I was brooding on wat munchable stuff I could make for his upcoming day off...and then I remembered an old time favourite my mom made for us as snacks when we were kids...CHEESE BISCUITS...(or they were called Cheese Bits by us..)...

My mom used to make them using Maida, Amul Cheese and bring it together with melted ghee...and then deep fry the bits in oil..A different version of the same recipe is used at work by adding 2 types of cheese and adding milk to make the dough smoother and easy to roll...so I combined the best of both recipe and came out with my own version of the bixies...and these are baked...my addition to this recipe is some flavourings...so here goes my recipe...

Ingredients:
1 Cup Grated Tasty Cheese (basically hard cheeses like Cheddar, Guyere etc)
1 Cup of Powdered Parmesan Cheese
2.5 Cups of Plain Flour(all purpose flour)
1/2 Cup of Full Cream Milk
240 gms of Unsalted Butter Salt and Pepper
Flavourings:
1/2 Cup of Pitted Kalamata Olives(chopped finely)
1/2 Cup of Sun-dried Tomatoes (chopped finely) Preparation

Process:
1. First add the Butter and the Cheese into a bowl and mix to combine them(if using an electric mixer then whisk on low speed for 1 or 2 mins to combine ingredients) to a creamy texture.

2. Then add the flour and salt&pepper and mix again till roughly combined. Then slowly while mixing add the milk.

3. If dough is sticky just add four to reduce the dampness. This is the basic dough for the cheese biscuits. Divide the mixture int 2 parts. and keep aside.

4. To one half of the mix add the finely chopped olives and mix thru till well combined. Mix thru the finely chopped semi dried tomates as well to the other half of the dough.

5. Then lightly flour the work surface you working on(just like how we do for chapatis before we roll them) and then roll the two kinds of dough into logs about 1cm(abut the size of a 1 Rupee coin) in diameter. The below picture illustrates that.


6. Line all the logs onto a lightly floured tray(to prevent from sticking). Refrigerate them for about 30 minutes to one hour to help firm up the dough.

7. Preheat your oven to 150*C. Line baking tray or cookie tray with baking paper.

8. Then bring out the rolled logs from the fridge and cut them into 1/2cm pieces.


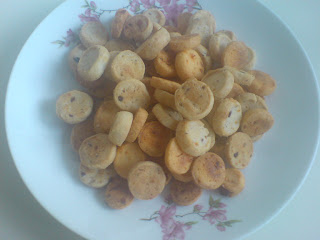
8. Line them on the tray and bake them for 20-25 minutes or until you are able to lift one from tray without it sticky or until light golden brown. (picture above)

9. Allow to cool on a different tray. Once they are cooled store them in airtight containers and these biscuits last for 1 week to 10 days.

10. They are a good accompaniment to tea or coffee or as an indulgent snack.

Variations:If you dont like any of the above mentioned flavours you can use chives or roasted bell peppers or just herbs like rosemary, thyme etc.

Image Source: My Trusty Phone Camera

Recipe Source: My Brain (he he he...:-D)

Hope you like the recipe...do let me know how they work out ( if you try them out)...

Happy Cooking...:-)

Saturday, March 1, 2008

Bobbatlu (Stuffed Sweet Parantha)

One of my dear friends has asked me for this recipe...so here goes....

Ingredients:
2 cups of plain flour (maida)
sufficient of water to make dough
2 cups of split chana dal(Senagapappu)
1 1/2 cup sugar/jaggery
1/2 grated fresh coconut
1 cup ghee
3 tablespoons oil
A pinch of cardamom seeds made into powder

Process:
1. Seive the maida and make a dough adding with water. Knead well. mix the oil through. Cover and leave the dough aside for atleast 15 minutes.

2. Cook the split chanadal with 4 cups of water for 15 minutes in a normal pot till the dal is completely cooked . Once done remove from stove and drain it.

3. Then add jaggery or sugar to the hot cooked daal and mash it till it becomes a paste. Don't add any water. Also add the grated coconut and cardamom powder. Keep aside for some time.

4. Make 8 equal sized balls with the dough and 8 same sized balls with sweet paste.

5. Spread oil on both hands, take one maida ball and spread the dough with fingers in such a way that a small puri is formed, put sweet ball in the center and cover the sweet ball with the edges of maida ball(just like we do with any stuffed parantha). Repeat the process with the remaining balls.

6. Now using a rolling pin and dusting from plain flor on the rolling plate, roll the stuffed balls out like normal roti or parantha style. Care must be taken to roll them gently and make sure that none of the stuffing come out.

7. Once all balls have been rolled like rotis, pan-fry them by applying ghee on both sides on a tava till they get a golden coloue.

8. Bobbatlu are ready to eat immediately. They taste best when made freshly amd eaten then itself. But these can store in the refrigerator upto 1 week.

My first recipe post....starting with a traditional Andhra Dish...I am very nostalgic now.... But anyone trying this out...Happy Cooking....


Recipe Source: My Mother's Recipe