Thursday, July 31, 2008

Another Award....Yipeee...:-)

Spandana of Cinnamon Trail forwarded me this "Brilliant WebBlog Prize".

Thank you Spandana so much for this....I feel really honoured....this was really sweet of you...:-)

Brilliant Weblog is a prize given to sites and blogs that are smart and brilliant both in their content and their design. The purpose of the prize is to promote as many blogs as possible in the blogsphere. Here are the rules to follow:

  • When you recieve the prize you must write a post showing it, together with the name of who has given it to you, and link them back.
  • Choose a minimum of 7 blogs (or even more) that you find brilliant in their content or design. Show their names and links and leave them a comment informing they were prized with ‘Brilliant Weblog’.
  • Show a picture of those who awarded you and those you give the prize (optional).

To not break the custom, I now pass on this Award to Sirisha's Ambrosia Flavours, Usha's Spicy Kitchen, Chaitali's Blog, Sia's Monsoon Spice, Deeba's Passionate about Baking Blog, Nandita's Saffron Trail, Swati Jain's SugarCraft India

I Would love to pass on this Award to each and everyone who visit my Blog....But mere laziness does not permit me too...

Thank You once again...Amu :-)

Friday, July 25, 2008

Whole Mung Bean and Mushroom Soup...

These days my Hubby is working evening shifts and comes home pretty late in the night sometimes as late as midnight. Because he works at a place where they provide meals, (yummy and varied varieties he says) he calls up and tell me that that he wont be coming home for dinner. And when he does not eat dinner at home, I loose interest in eating anything at all. So I just drink up a juice or something like that and just sleep off. Now this has had an effect on my health.

So these days I cook up a One-Pot dish which is not only easy to make but also delicious and most importantly LOW-CALORIE...I personally love consuming Soups on a day to day basis unlike my Hubby who can have it only once a while. Winter this year in Melbourne is very very chilly and what better to have for dinner than a Steamy Hot Bowl of Soup...which is also healthy...What a Bonus...:-)

So here goes the Recipe...

Ingredients:
1 Cup Whole Mung Beans (Moong Dal or Pesaralu)
1 Medium Onion (chopped finely)
5 pods Garlic(chopped finely as well) (I love garlic so...but you can reduce the amount)
5-10 Button Mushrooms (depending on the size....sliced up...)
2 teaspoons Olive Oil
Salt and freshly crushed pepper to taste

To Garnish:
Chopped Coriander
Slithers of Spring Onion
Yogurt

Process:
1) Wash and Soak Moong Dal in Hot Water for 10 minutes.

2) Put them in a Pressure Cooker and add 2 cups of water and some salt and pressure cook them on medium flame till you you get 2 or 3 whistles. When cooled just mash it but not to a complete paste. Keep aside.

3) Then heat the oil in non-stick pan and saute the onions till translucent. Then add garlic and sliced mushrooms and saute for further 1 minute.

4) Then add the slightly mashed moong dal and if need be more water or vegetable stock bring to boil. Simmer on low flame for 10 minutes.

5) To finish, add salt and pepper as per your liking. Garnish with chopped coriander and spring onions and a light drizzle of yogurt.

Variation:
If the above recipe is too bland for your palette, then you can add a teasppon each of Cumin and Corainder Powder. If you want it to be spicy then you can add Chilli Powder accordingly.

To make the soup more enriching you can add some cooked Barley(available in all health stores) or even Broken Burghul Wheat.

I Just like mine plain and simple and served with a Crusty Piece of Bread preferably Wholemeal or Wholegrain...

So enjoy the Soup...and until next time...
Happy Cooking :-)

Thursday, July 24, 2008

White Chocolate, Almond and Vanilla Cookies...

Last year I received a gift from my very close friend seeing how passionately involved I was getting into my Job...as a Pastry Chef... It is a 3 Book Series...Cakes, Cookies and Cupcakes and each book has 500 Recipes..:-)...Love ya Wendy for the lovely gift...

I was initially excited to get the books because that means I had means to upteem number of recipes and I could try one each day..[or I planned too...what a Joke..:-D]...First few weeks every weekend I gave a try to one or two recipes at work...(I work on weekends :-( )...but as time passed...I just left the books aside in my Book Shelf because I got more busy at work for the regular stuff and had no time to work on new recipes...let alone my experiments...:-D

But this year I was asked by my Boss to work on some new Cookie or Biscuit recipes to update our Menu...I immediately opened up the Book of 500 Cookie recipes and browsed until I ended up with this recipe...When I tried them in a small batch at home...they worked very well and i took a Taste Sample to my Boss and she was equally happy and immediately included this on our menu....Believe me it is one of the easiest recipes I have ever worked on and we produce about 250 at a time at work...and the whole making the dough and weighing and baking takes a total of just 1 hr....for 250 biscuits thats a lot less time....when comapred to the 4 hours i spend on some other Biscuit varieties.

So now lets get into some serious Biscuit Baking Business...and I will leak this guarded recipe for all of you to enjoy...

Here Goes...
Ingredients:
  • 125gms Unsalted Butter (softened to room temperature)
  • 1 Cup Caster Sugar (Fine Grain White Sugar)
  • 1 Egg (55-60 gms)
  • 1tsp Vanilla Extract (or use Vanilla bean from the Vanilla Pods)
  • 1/2 tsp Salt
  • 125gms White Chocolate Buttons
  • 60gms Slivered Almonds(or Whole Almonds sliced up into thin slithers)
  • 1+ 3/4 Cups of Self Raising Flour

Process:
1) Firstly Preheat oven to 180*C. Line a Baking tray with Baking Paper.
2) Then take the softened Butter and Sugar in a bowl and using a electric beater, beat(cream in professional terms) the mixture on a medium speed till pale and fluffy.
3) Then add the egg and vanilla and beat again till well mixed through. Donot over beat at this stage.
4) Sieve the SR Flour and Salt together into the above mixture and fold through using a spatula or spoon.
5) Then finally add the White Chocolate and Almonds and mix thru till well incorporated.
6) Make equal sized balls ( makes 20 to 25 depending on size) and place on the lined Baking Sheet atleast 5 cms Apart from each other because these spread a lot.
7) Bake initially for 10 minutes and then using the tip of your fingers flatten them slightly( very less pressure)
8) Continue baking for another 10 minutes till they get a light golden colour (to check if they are done the simple tip is you should be able to lift them easily without breaking them.)

9) Cool them and Serve.
10) When completely cold, these can be stored in an airtight container for atleast a week.

A simple but delicious Cookie recipe...and these can be made in advance for parties and can be taken as small token gifts to families you are visiting especially if they kids...and I promise they will love them...

Please Note: The Oven Types and Temperatures vary for each and everyone of us... So please bake them accordingly... If using a Fan-forced oven the temperature should reduced by 20*C (i.e 160*C). But the tip to check if your biscuits or cookies are done is given above so varying oven temperatures should not be a Problem...:-)

Image Source: My Phone Camera.

Recipe Source: 500 Cookies by Phillippa Vanstone

Hope you like this Recipe....Give it a Try and do let me Know..

Until Then...Happy Cooking :-)

Tuesday, July 22, 2008

My First Award....:-)

Dear Friends...
I am very pleased to let you all know that I have received "My Very First Blog Award"...

Keerthi of Cuminhut has passed on this award "Yummy Blog Award" to me...Thank You so much Keerthulu...Donot know if I deserve this Honour...But Thank You so Much...:-)

I dont know whether I deserve the award at all because I am not a regular blogger as would like to be because of several factors...But this Award has inspired me to push myself to do better than one post a month...So I promise from now on I would be more regular at posting most Yummy and Delicious Recipes... esp Desserts...

I am so happy and thanks to each and every visitor of this Blog. The ones I need to specially thank are the ones who leave thier valuable comments and encourage me to participate actively here...

I Therefore pass on this Award to Sirisha of Ambrosia Flavours, Spandana's Cinnamom Trial and Chaitali's Blog...

Thanks Again One(Keerthi) and All...

Loads of Love..Amu

Saturday, July 19, 2008

Pineapple Gateaux...aka Pineapple Pastry...

Finally I am blogging after a Long Gap...I have been pretty busy and then my health took a down turn...So I have reduced my work hours which has given me more time to do things I like most...like for example Cooking..:-)

Last Week I Graduated as a "Hospitality Graduate".. These two years of Study has taught me so much and it just not a New skill but Real Life Leasons especially to believe in myself and for that I am Thankful to some very good teachers at Meridian...When we came back home after the Ceremony I was reviving my memories by browing some photos of my Cake Creations made at School...My Husband was watching them with me and when the photo of the Pineapple Gateaux came up...he smiled and said I would love to eat another one of those...(Basically both of us are not very keen on eating sweet things...esp Cakes and Stuff...yeah yeah i know...Contrary to what I do...but thats how it is...)

His wish is my Command....so decided to suprise him the next day by making the cake...so the next day...I had some work in the city and after that i went shopping to buy stuff needed for the Gateaux...I hurrily shopped and rushed back home...(though it is a routine for us when I go to city to wait up for him till he finishes work and we come home together..)...but my Plans for the suprise made me hurry back...and I completed the cake in record time....

Now Coming to the Recipe....
Ingredients:
1 Sponge Cake (8" Diameter)
1 Tin Pineapple Slices (250gms to 300 gms)
500gms Whipping Cream
1tsp Pineapple Essence
2 tbsps Powdered Sugar (pure icing sugar)
150ml Syrup (make it by adding pure pineapple juice and powered sugar)
To Garnish:
Whipped Cream
Slices of Pineapple
Glace Cherries

Process:
1) Cut the sponge base in half using a serrated knife.

2) Face the soft side up of the cut sponge and then sprinkle heavily with the syrup on both cut pieces (the sponge must become really wet and soaking). Keep aside to soak the syrup well.

3) Meanwhile whip the Cream using an electric beater with whisk attachment till it forms soft peaks(when lifted with spoon, the cream should hold its shape). Halfway through the process of whipping cream add the powdered sugar and pineapple essence.

4) Keep the whipped cream chilled in a refrigerator till you use it.

5) Cut up the pineapple slices into small pieces and keep aside.

To Assemble:
1) Take one sponge base and place it facing the soft side up, then dollop 1/3rd the amount of whipped cream on top of it and spread it evenly.

2) Then spread the pineapple pieces evenly on top of the covering taking cake that there no empty spaces.

3) Carefully place the second half of the sponge on top the cream layer in such a way that the soft side goes on top of cream and hard side faces up.

4) Now spread another 1/3rd of the cream of the top layer and spread evenly on top. Use the same to mask the sides to cover up the sponge on the sides neatly.

5) Now Scoop up the remaining mixture into a piping bag with a medium star nozzle and keep aside.

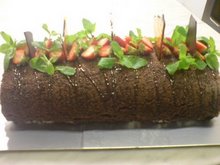
6) Mark your cake into number of slices. This recipe makes 8 slices and pipe cream at the corners and centre as shown in the picture below.

7) Top up with Glace Cherries and Pineapple.

8)Decorating the Final Part is left to your imagination. If you are short for ideas then you can use the picture below to get some ideas.


I made the Sponge from scratch but you can also do them with store bought sponges and it makes the process more simpler.

Hope you like this Recipe as much as my Husband enjoyed it....and here's a slice for the ones I would love to personally serve up.


Image Source : My Phone Camera.
Recipe Source : My Cakes Class and my Ideas.

In my next post I will put up an easy to make but foolproof sponge which help in making any cakes an easy job.

So until then...Happy Cooking..:-)